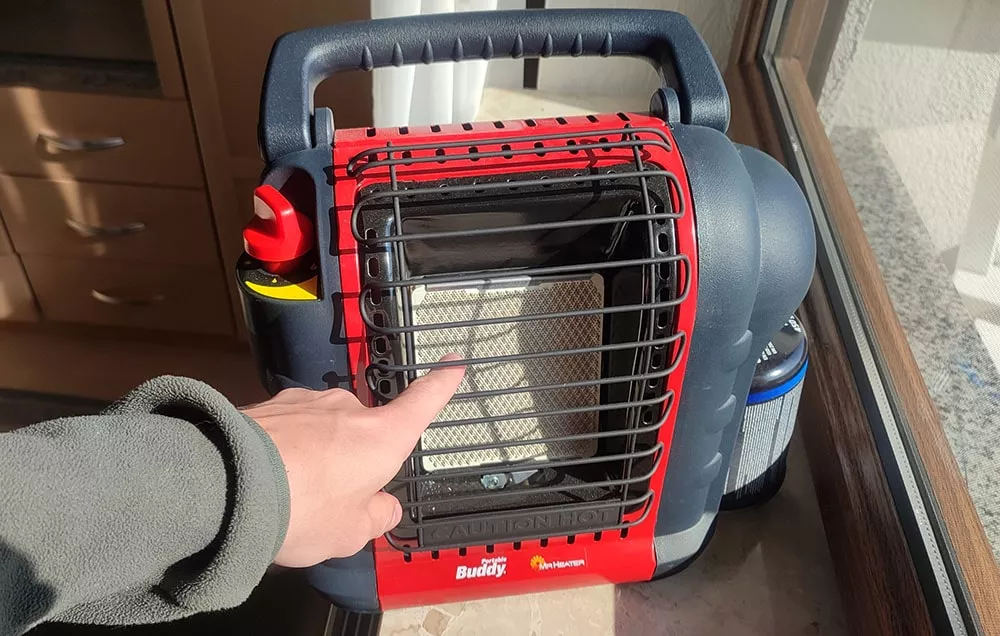
During the chilly months, a reliable portable heater like Mr. Heater can be a true lifesaver, radiating warmth and making indoor spaces comfortable and cozy.
However, like all appliances, Mr. Heater units have components that may wear over time, and one such crucial component is the ceramic burner tile.
The burner tile is prone to cracking due to the constant heating and cooling cycles it undergoes.
A cracked burner tile can lead to inefficient heating and even pose safety risks.
Therefore, replacing a cracked burner tile is essential to ensure the efficient and safe operation of your Mr. Heater unit
The good news is, with some basic tools and a little patience, you can undertake this task at home without the need for professional help.
In this guide, we’ll walk you through a step-by-step process on how to replace the ceramic burner tile in various Mr. Heater models.
Whether you own a Mr. Heater Buddy, Little Buddy, Hunting Buddy, or Big Buddy, this guide will provide you with a clear pathway to restoring your heater to its prime condition, ensuring many more warm and comfortable days ahead.
Quick answer: To replace your Mr. Heater Burner tile, you’ll need to buy a replacement burner tile kit for your Mr. Heater model. Then, you can disassemble your heater, loosen the bracket holding the ceramic tile, and replace the tile and the gasket.
Steps to Replace Your Mr. Heater Ceramic Burner Tile
1. Look up the Model Number of your Mr Heater
First of all, you need to buy the necessary replacement parts. But replacement parts are often labeled using the official model number.
So, let’s first look up the model number of your Mr. Heater model:
| Mr. Heater Model | Model Nr. | |
|---|---|---|
| Mr. Heater Little Buddy | MH4B | |
| Mr. Heater Buddy | MH9BX | |
| Mr. Heater Hunting Buddy | MH12B | |
| Mr. Heater Big Buddy | MH18B |
If your model is not on the list, look it up directly on the back side of your Mr. Heater unit.
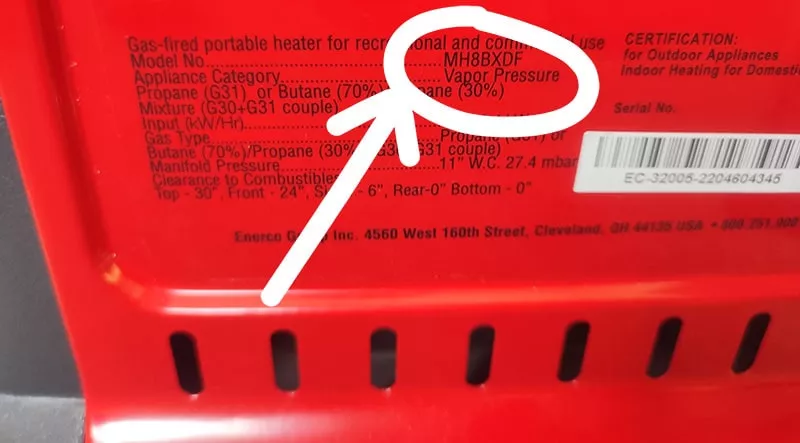 My Mr. Heater Buddy has the Model number MH8BXDF. I think the model number differs from the table above because I have a European model.
Or, alternatively, look up the model number on a sales page of your Mr. Heater model. On Amazon, you’ll usually find the model number in the description of the heater.
2. Get a Replacement Burner Tile and Gasket
For a complete burner tile replacement, you’ll need
- a fitting replacement burner tile and
- a burner gasket (the old one is likely burnt and can’t be reused)
The burner burner gasket is a piece of felt that insulates gas leaks.
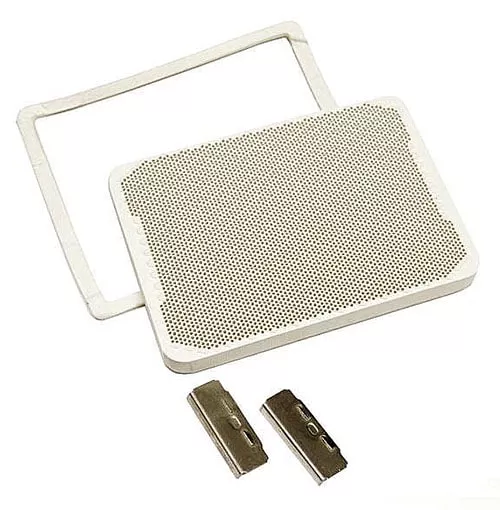 Ceramic burner tile and gasket replacement kit
Usually, the tile and the gasket are sold together in a kit. If you can’t find a kit, you can also buy them separately.
If you live in the US, buy from the official Mr. Heater website.
Often, on the official website, replacement parts are out of stock. Or, if you live overseas, possibly you can’t order at mrheater.com directly
If your replacement parts are out of stock or you live overseas and can’t place an order at mrheater.com directly, you can check out Mr. Heater replacement parts at lioncove.ca.
3. Disassemble your Mr. Heater unit
Once you have the replacement parts for your Mr. Heater, you’ll need to disassemble it to access the ceramic burner tile.
The disassembly varies from model to model:
Here are quick instructions for the Buddy and Big Buddy models. The Hunter Buddy is probably similar.
How to Disassemble the Mr. Heater Buddy
For visual guidance, refer to this video (only follow the beginning part to open up the back and front, because later he takes the entire Buddy unit apart).
- Remove Screws from Handle: Locate and remove all screws on both sides of the handle.
- Remove Handle: Take off the handle to access the back of the heater.
- Open the Back of the Heater: Unscrew any screws holding the back cover in place.
- Remove Front Panel Screws: Unscrew screws holding the front panel in place.
- Pop out the Black Heat Reflector on the Front: Now you can fully open up the front panel that covers the ceramic tile’s brackets.
How to Disassemble the Mr. Heater Big Buddy
Explaining a disassembly in writing is hard. Here’s a video you can follow.
- Unscrew all Screws holding the Back Cover: The Big Buddy has many screws, so make sure you don’t miss any.
- Push up the Back Cover: Push up the back cover to remove it.
- Unscrew the Black Heat Reflector on the Front from the Back: Unscrew the screws holding the front panel heat reflector in place. These screws are accessed from the back.
4. Replace old burner tile
To replace the old burner tile, gently remove it from its bracket. Likely, you’ll need to loosen the bracket using one or two screws responsible for tightening and loosing which sit at the bottom of the contraption.
Remove the old burner tile. Scrape out the old gasket. Likely it’s burnt and falls apart.
Put the new felt gasket in place.
After that, position the new burner tile in the bracket ensuring it sits flat and snug.
Once the new burner tile is in place, tighten the bracket screw securely to hold the burner tile in place. Ensure it’s well-secured but not overly tightened to prevent any damage to the new tile, especially when it heats up.
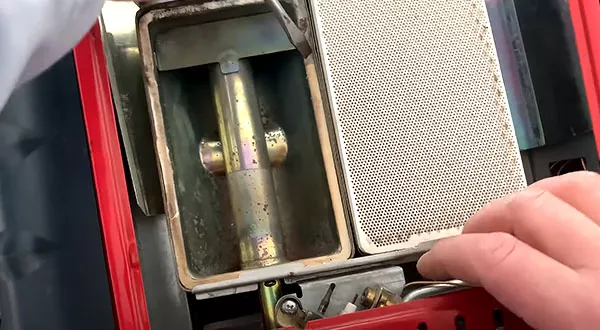 Scrape out the old gasket and replace the new ceramic burner tile! The image shows the Mr. Heater Big Buddy. But it works the same in the Mr. Heater Buddy.
5. Reassemble your Mr. Heater
Now, it’s time to reassemble the heater. Follow the disassembly steps in reverse to put your heater back together.
Start by securing the front panel, then reattach the handle using the screws you had removed.
Ensure all screws are tightened securely but not overly so to avoid damaging the heater.
6. Test the Heater
After you’ve successfully reassembled your Mr. Heater, it’s crucial to test it to ensure the burner tile replacement was successful and that the heater operates correctly.
Turn on your Mr. Heater and observe the flame. It should ignite smoothly and produce a clean, blue flame.
If it doesn’t, double-check your work to ensure everything has been reassembled correctly. You can cross-check with this guide: How to fix a Mr. Heater Buddy not lighting
Safety Precautions
Disconnect the propane heater before you start the disassembly for the tile replacement. An accidental punctuation of the gas hose or the gas bottle can lead to dangerous gas leaks.
Always ensure to work in a well-ventilated area when replacing the burner tile of your Mr. Heater.
It’s also advisable to have a fire extinguisher nearby for safety. Make sure the heater has cooled down completely before you start the replacement process, and ensure there is no gas leakage during the assembly or disassembly.
Conclusion
In conclusion, replacing the ceramic burner tile in your Mr. Heater is a straightforward task when you follow the correct steps.
With the right tools and a little patience, you can extend the life of your heater and continue enjoying warm and comfortable spaces during the cold months.